
|
DT Receiver - Rx31 Instructions - v3.3.x
|


|
1. GENERAL:
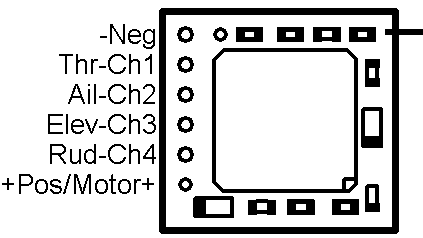
3-6v may be connected with correct orientation to +/- points.
Points marked Ch1-4 are signal connections.
The Rx is not insulated so take care to avoid short circuits.
The PCB is thin so do not bend it or exert great force on it.
The receiver will work with DSM2-capable transmitters (surface and air).
The Tx/Rx may be switched On/Off in any order.
2. LED:
Led On = perfect reception (real-time indicator).
Led Off = not perfect (useful for range tests/interference indicator).
1 flash = Scanning (~2sec between flashes; wrong model if never stops).
2 flash = Brownout (receiver voltage went too low; check battery/servo load).
4 flash = Failsafe (signal lost for >1s eg: Tx switched off before Rx).
5 flash = Watchdog (program recovery mechanism; should never happen).
3. FAILSAFE:
Outputs are not driven (do nothing) on startup and while scanning.
Outputs 'hold' on short signal losses (<1sec) and then do nothing (>1s).
4. BINDING:
1. Switch Rx on and wait ~20s until led flickers fast.
2. Switch Tx on in bind mode and Rx led should flash slowly and then go solid.
3. Change distance between Tx/Rx if binding does not work.
5.1 OUTPUTS:
Ch1-4 will normally be used for servos or an external ESC. Ch3 can be set to produce a 7 channel data stream suitable for multi/quadcopter type models.
5.2 OUTPUTS WITH SURFACE TRANSMITTERS (DX3)
Ch1 and Ch4 are Throttle, Ch2 is Steering and Ch3 is Aux.
The receiver is intended to be used at 16.5ms frame length.
6. BRUSHED ESC:
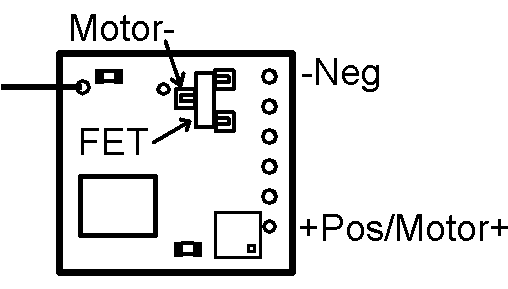
The Rx has an optional integrated brushed ESC. This requires the supplied FET to be soldered to bottom of the Rx in the position shown in the diagram above. It has a conservative 2A rating. It is a 'one direction' ESC for aircraft (ie: no 'reverse').
The +Positive supply to the motor needs to come direct from the battery. The -Negative supply to the motor is via the FET on the receiver. Reverse motor connections to change rotation direction.
'Travel Adjust' set to 100% both ways normally gives full control over the motor (completely off to fully on). Adjust if necessary. The throttle has to be below 10% to arm the ESC on startup and after any failsafe event.
A 3.0v LVC (Low Voltage Cutoff) is enabled by default but can be disabled. The ESC will rearm after a low voltage event if the throttle is closed briefly. The led will have a 2-flash if LVC is triggered.
7.1 PROGRAMMING:
Some options can be selected over radio link using the Elevator stick.
High/Low selects alternatives and mid-stick then confirms a choice and moves on.
'High' means pushing the elevator stick towards the top of the Tx (if not reversed).
The Steering wheel is used instead of Elevator on surface radios (left=high).
The led flashes the option currently being set (eg: Option 1 = single-flash 1sec apart).
The Rx assigns a value to each option (Low elevator=0; High=option number).
The Rx flashes the sum of all options once complete to confirm settings.
The Tx changes frequencies every time it is switched on. Programming mode can only be entered if the Tx is using the same frequencies as were used during the most recent bind. So you have to perform a successful new bind (led comes on solid), keep the Tx on to maintain the same frequencies, and then power cycle the Rx 3 times making sure the led comes on solid after each power cycle. The led should then give a repeating single-flash every 1 second. This is described in steps below:
7.2 PROGRAMMING PROCEDURE:
1. Bind Rx to Tx and led will come on solid.
2. Keeping the Tx ON, switch the Rx OFF then ON until it reconnects again (led on).
3. Perform step 2 three times until led flashes the first program option (single-flash).
4. Use High/Low Elevator to make choices and mid-stick to confirm and move on.
5. Switch Tx off at any time to save settings.
6. The led will then flash the sum of new program settings; switch Rx off when done.
7. Switch Rx off before Tx at any time to exit without saving changes.
8. To restore defaults, perform steps 1-3 and switch the Tx off (or select Low elevator on all options). The led will not flash after switching the Tx off because all options are reset to 0/Low.
7.3 PROGRAM OPTIONS/FLASHES (L=0=Default or not applicable):
Option 1:
- L = Integrated ESC low voltage cutoff ENABLED
- H = Integrated ESC low voltage cutoff DISABLED
Option 2:
- L = Sequential PPM DISABLED
- H = Sequential PPM ENABLED
Option 3:
- L = Serial output DISABLED
- H = Serial output ENABLED
7.4 PROGRAMMING EXAMPLES:
EXAMPLE 1: Servo outputs and LVC of integrated ESC enabled
Option 1-3 Low
Flashes after programming 0
EXAMPLE 2: Servo outputs and LVC of integrated ESC disabled
Option 1 High
Option 2-3 Low
Flashes after programming 1
EXAMPLE 3: Sequential PPM enabled
Option 1 Low
Option 2 High
Option 3 Low
Flashes after programming 2
EXAMPLE 4: RS232 Serial output enabled
Option 1 Low
Option 2 Low
Option 3 High
Flashes after programming 3